
How to Blend Concealer Like a Pro for a Natural Finish
Concealer can work wonders, hiding dark circles, blemishes, and redness in seconds. The secret to a flawless look isn’t just the product itself it’s how you blend it. Blending concealer like a pro creates a natural finish that enhances your skin without looking heavy or caked.
Finding the perfect concealer doesn’t have to be expensive. Exploring the best concealer price in Pakistan can help you discover high-quality options that fit your budget. With the right product and blending technique, you can create a smooth, long-lasting finish that complements your natural beauty.
The key to blending lies in understanding your concealer’s texture and your skin’s needs. Different textures require different techniques, so choosing the right formula helps blend. For example, when comparing Liquid vs. Cream Concealer, liquid formulas are easier to blend for a lightweight finish, while cream concealers offer fuller coverage for stubborn imperfections.
A smooth application starts with proper skin prep, ensuring your concealer glides on evenly. Using a damp sponge or a brush tailored to your formula can make all the difference. With the right approach, you can achieve a flawless, natural look that lasts all day.
Mastering Tools to Blend Concealer
Your tools set the stage for a natural finish. Picking the right one makes blending easier and more effective.
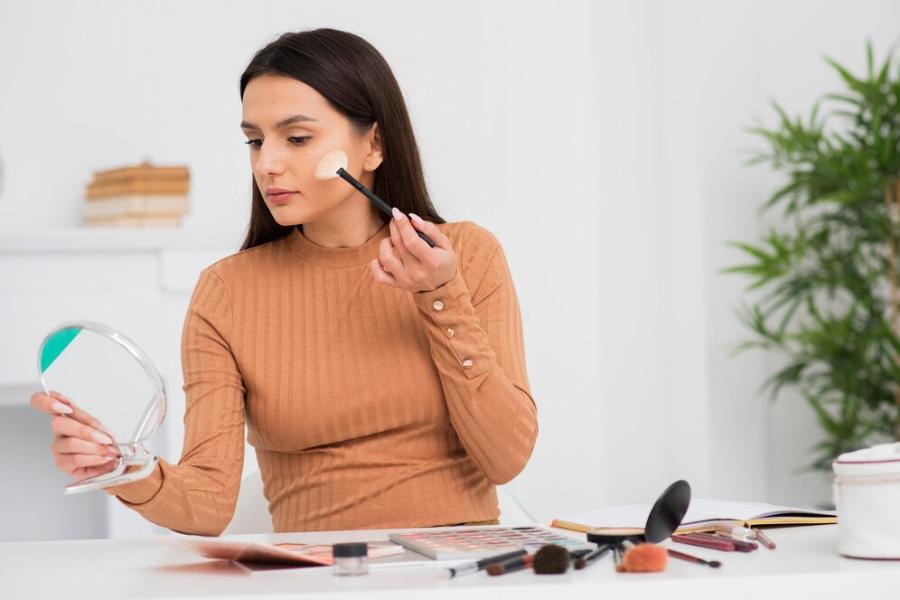
Makeup Sponges
A damp makeup sponge is a blending superstar. It presses concealer into the skin for a soft, airbrushed look. Use the pointed end for precision around the eyes and the flat side for larger areas.
Brushes
Small, dense brushes offer control. They’re great for targeting blemishes or layering under-eye coverage. Synthetic bristles work best, picking up less product and blending smoothly.
Fingertips
Your fingers are a free, handy tool. The warmth helps melt concealer into the skin, especially creamy formulas. Pat gently to avoid tugging delicate areas.
Perfecting Techniques to Blend Concealer
The technique is where the magic happens. How you apply and blend determines the final look. A flawless finish starts with Perfect Prep for Concealer, which includes hydrating your skin and using a good primer to create a smooth base.
Dabbing the concealer instead of rubbing helps maintain coverage while blending seamlessly into the skin. Using the right tools, like a damp sponge or a precise brush, ensures even application. Setting with a light layer of powder helps lock everything in place for long-lasting wear.
Dot and Pat Method
Start by dotting concealer, like under the eyes or on spots. Use a sponge or fingertips to pat it in. This builds coverage without streaks. Blend outward to fade edges into your skin.
Triangle Trick for Under-Eyes
Draw a triangle under each eye with the base along the lower lash line for dark circles. Blend upward with a sponge. This brightens and lifts the face naturally.
Stippling for Blemishes
Dab concealer onto blemishes with a brush, then stipple (lightly tap) to blend. This keeps coverage focused while softening harsh lines.
Applying Concealer for a Natural Finish
A natural finish means no one can tell you’re wearing concealer. Here’s how to nail it.
Start with Less
Apply a small amount first. Too much product leads to caking, even with perfect blending. Build coverage gradually if needed.
Blend Into Foundation
The concealer should merge with your base. Apply foundation first, then concealer, blending where they meet. This avoids patches or colour shifts.
Use Light Layers
Thin layers blend better than a thick coat. Dot on a little, blend fully, then add more only where necessary. This keeps the finish light and smooth.
Blending Liquid vs. Cream Concealer
Concealer type affects your blending approach. Liquid and cream formulas need different handling.
Liquid Concealer Tips
Liquid concealers are fluid and lightweight. Use a damp sponge for a sheer, even finish. Blend quickly before they set, especially matte ones, to avoid streaks.
Cream Concealer Tips
Cream concealers are thicker and richer. Warm them with your fingers first, then pat and blend with a brush or sponge. Take time to soften edges, as they can settle heavily.
Adjusting Blending for Skin Types
Your skin type influences how concealer blends. Tailor your method for the best outcome.
Oily Skin
Oily skin needs a light touch. Use a matte concealer and blend with a sponge to avoid excess shine. Set with powder to lock it in place.
Dry Skin
Dry skin craves hydration. Blend a creamy concealer with fingertips or a damp sponge to smooth flakes. Avoid over-powdering to keep it natural.
Combination Skin
Combination skin requires balance. Blend lightly on oily areas with a sponge, and use your fingers on dry patches for extra moisture. Adjust based on texture.
Avoiding Common Blending Mistakes
Blending mishaps can undo your efforts. Here’s what to steer clear of.
Over-Blending
Too much blending rubs off coverage—Pat and press instead of dragging to keep the product where it belongs.
Skipping Prep
Unprepped skin resists blending. Moisturize first to create a smooth canvas, especially on dry or textured areas.
Wrong Tool for the Job
A dry sponge or stiff brush streaks concealer. Match your tool to the formula: damp sponges for liquids, soft brushes for creams.
Enhancing Your Blend with Pro Tricks
Take your blending up a notch with these expert tips.
Warm It Up
Warm cream concealers between your fingers before applying. This softens the texture for easier blending and a natural melt into the skin.
Mix with Moisturizer
For a sheer finish, mix a drop of moisturizer with your concealer. Blend as usual for a lighter, dewy look, perfect for minimal makeup days.
Bounce, Don’t Swipe
Bouncing a sponge or brush blends better than swiping. It presses the product in without disturbing the layer underneath.
Setting Your Concealer for Longevity
Blending isn’t the end. The setting keeps your natural finish intact all day.
Powder Setting
For oily skin or blemishes, dust a light layer of translucent powder. This prevents creasing and shine without looking heavy.
Spray Setting
For dry skin or under-eyes, mist with a hydrating setting spray. It locks in moisture and keeps the finish fresh.
Combo Approach
On combination skin, powder oily zones and spray dry ones. This balances longevity with a natural glow.
Top Concealers for Easy Blending
Some concealers blend better than others. Here are standout picks.
Liquid Options
- Maybelline Fit Me Concealer: Lightweight and blendable with a sponge for oily skin.
- L’Oréal True Match Concealer: Fluid and natural, perfect for quick blending.
Cream Options
- NARS Radiant Creamy Concealer: Smooth and hydrating, blends effortlessly on dry skin.
- Tarte Shape Tape Concealer: Creamy yet buildable, great with a brush or fingers.
Practicing Your Blending Skills
Blending like a pro takes practice. Start small and build confidence.
Test on Small Areas
Practice on your under-eyes or a single blemish. Focus on softening edges and keeping them light.
Experiment with Tools
Try a sponge one day and a brush the next. See what feels most comfortable and gives the smoothest result.
Watch Your Progress
Blend in natural light and check your work. Adjust pressure or product amount until it’s seamless.
Final Thoughts
Blending concealer like a pro is about technique, tools, and patience. Whether you’re using liquid or cream, the goal is a natural finish that enhances your skin. Start with the right prep, pick your tools wisely, and blend with care.
Add Your Heading Text Here
How to make concealer look natural?
Use a lightweight, buildable concealer and apply it in thin layers. Blend it well using a damp sponge or your fingertips for a seamless finish. Set with a light dusting of translucent powder to prevent creasing.
How can I make my concealer blend better?
Prep your skin with moisturizer to ensure smooth application. Use a damp beauty sponge or a fluffy brush to blend the edges seamlessly. Let the concealer sit for a few seconds before blending for better coverage.
Is it better to blend concealer with a brush or sponge?
A sponge provides a more natural, dewy finish and works best for under-eye concealer. A brush offers more coverage and precision, making it ideal for blemishes and targeted areas. Choose based on your desired finish.
How do I make my concealer look flawless?
Start with a hydrated base, apply a thin layer of concealer, and blend well. Use a setting powder to lock it in place and prevent creasing. Avoid applying too much product, as it can look cakey.
How do you make concealer look real?
Pick a shade that matches your skin tone perfectly and apply it sparingly. Blend well into the skin, focusing on seamless transitions. Setting with a fine-milled powder helps maintain a natural look all day.